DNS validation of SSL certificates
How to validate domain ownership with a DNS TXT or CNAME record for DV certificates.

Introduction
This guide describe creating DNS TXT- and DNS CNAME-records on the most used DNS platforms.
The process will be similar on other platforms, but if you experience issues you are always welcome to contact us.
One the DNS record has been validated and the certificate issued that record will never be used again, and can safely be removed.
AWS
CNAME-record
- Login to your AWS control panel.
- Navigate to Route 53.
- Click Hosted zones and then the domain you wish to create a CNAME record for.

- Click Create record.

- Enter the information you have received in an email.
Record name: The address the record should point from on your domain. Only enter the part that is not pre-filled. Remember the initial underscore. e.g.: _1f104a0bc617b3f5d05016e924c07fa7
Record type: Set to: CNAME - Routes traffic to another domain name and to some AWS resources.
Value: The address the record should point to at the issuer. e.g.: 24BA199E88C4D7A460F7BF28DDFB4AE8.57D5EDEE1A1935B34D4836A5867F9244.105087.sectigo.com
TTL: Set to: 3600
Routing policy: Set to: Simply routing
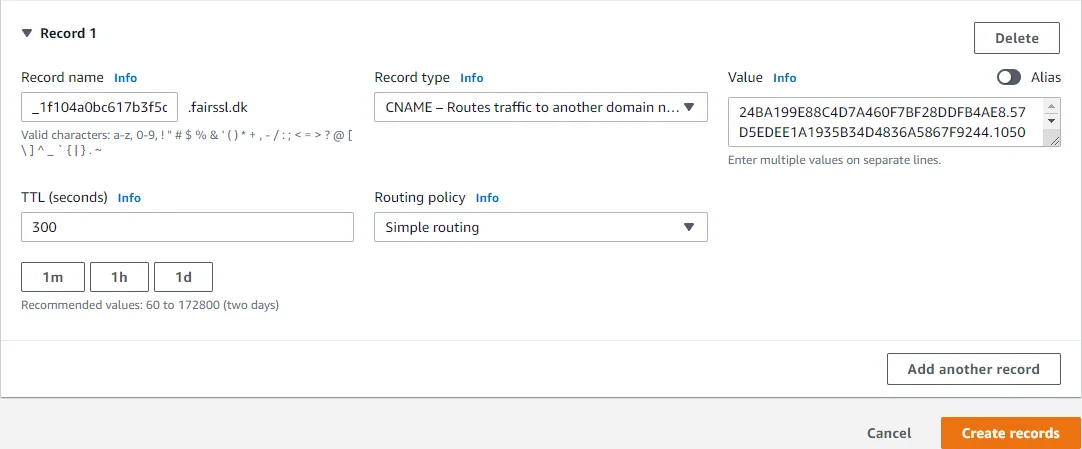
- Click Create records.
TXT-record
- Login to your AWS control panel.
- Navigate to Route 53.
- Click Hosted zones and then the domain you wish to create a TXT record for.
- Click Create record.
- Enter the information you have received in an email.
Record name: The DNS name the certificate is to be validated on, if it is the base domain leave the field blank.
Record type: Set to: TXT - USed to verify email senders and for application-specific values
Value: The text string you have received.
TTL: Set to: 3600
Routing policy: Set to: Simply routing
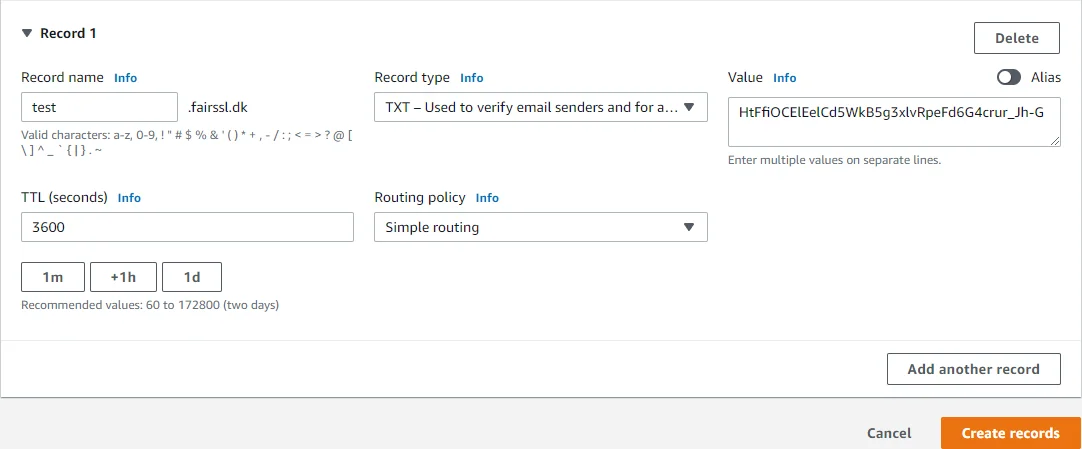
- Click Create records.
Azure
CNAME-record
- Login to your Azure control panel.
- Navigate to DNS zone.
- Click the domain you wish to create a CNAME record for.
- Click Record set.
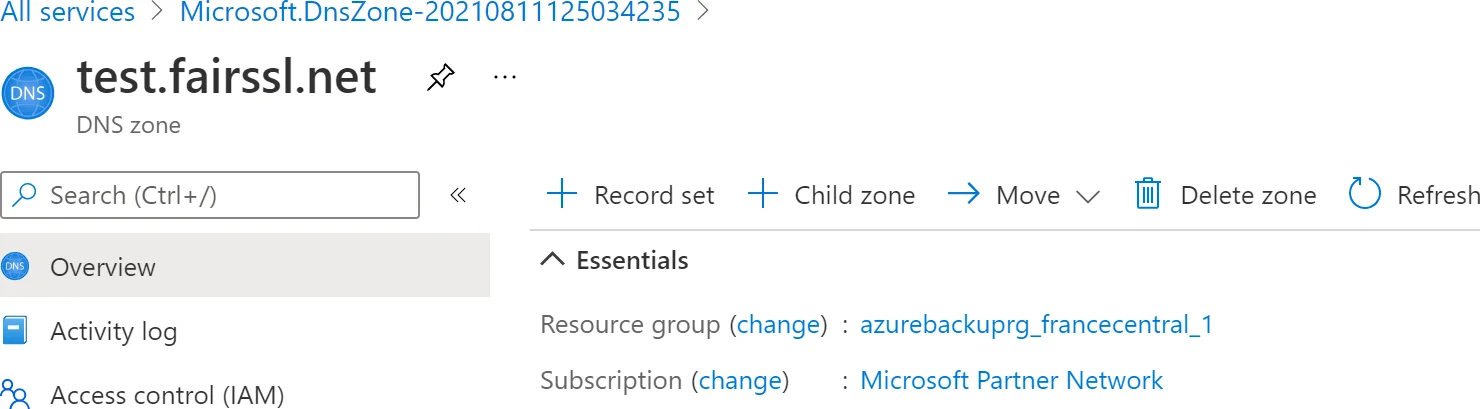
- Enter the information you got in the email on the right side.
Name: The address the record should point from on your domain. Only enter the part that is not pre-filled. Remember the initial underscore. e.g.: _1f104a0bc617b3f5d05016e924c07fa7
Type: Set to: CNAME - Link your subdomain to another record
Alias record set: Set to No
TTL: Set to 1 hour
Alias: The address the record should point to at the issuer. e.g.: 24BA199E88C4D7A460F7BF28DDFB4AE8.57D5EDEE1A1935B34D4836A5867F9244.105087.sectigo.com
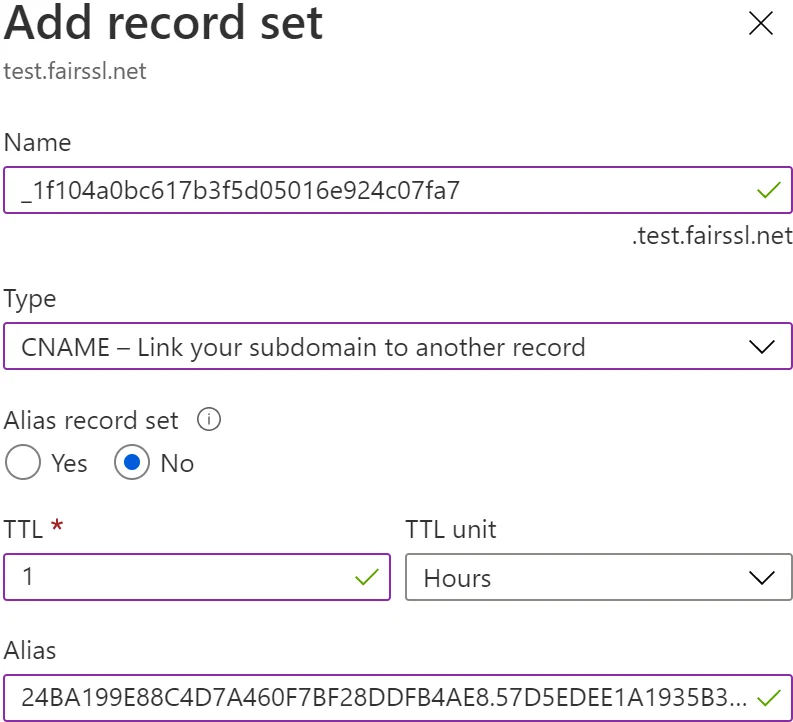
- Click OK at the bottom.
TXT-record
- Login to your Azure control panel.
- Navigate to DNS zone.
- Click the domain you wish to create a TCT record for.
- Click Record set.
- Enter the information you got in the email on the right side.
Name: The DNS name the certificate is to be validated on, if it is on the base domain the field can be left blank or an @ can be entered.
Type: Set to: TXT - Text record type
TTL: Set to: 1 hour
Value: The text string you have received.
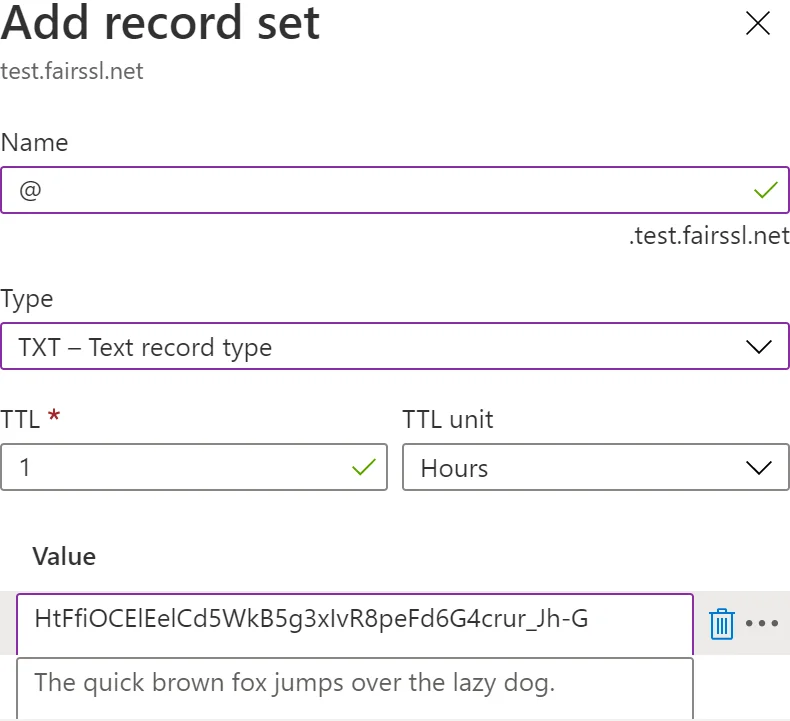
- Click OK at the bottom.
Domainnameshop
CNAME-record
- Login to your Domainnameshop control panel.
- Click My domains and then the domain you wish to add a record to.

- Click Manage DNS records

- Click Show advanced settings to be able to add a CNAME record.
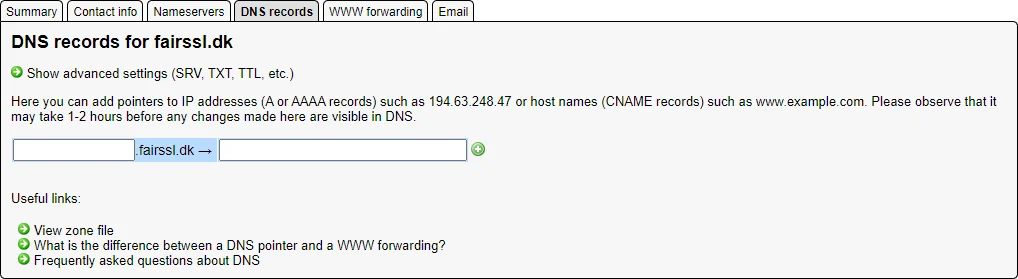
- Enter the information you have received in an email.
Host name: The address the record should point from on your domain. Only enter the part that is not pre-filled. Remember the initial underscore. e.g.: _1f104a0bc617b3f5d05016e924c07fa7
TTL: Set to: 1 hour
RR type: Set to: CNAME
Value: The address the record should point to at the issuer. e.g.: 24BA199E88C4D7A460F7BF28DDFB4AE8.57D5EDEE1A1935B34D4836A5867F9244.105087.sectigo.com

- Click the green plus to add the record.
TXT-record
- Login to your Domainnameshop control panel.
- Click My domains and then the domain you wish to add a record to.
- Click Manage DNS records
- Click Show advanced settings to be able to add a TXT record.
- Enter the information you have received in an email.
Host name: The DNS name the certificate is to be validated on, if it is on the base domain the field can be left blank or an @ can be entered.
TTL: Set to: 1 hour
RR type: Set to: TXT
Value: The text string you have received.

- Click the green plus to add the record.
GratisDNS
CNAME-record
- Login to your GratisDNS control panel.
- Click DNS on the top bar.

- Click Ændre on the right side of the domain you wish to add a CNAME record to.
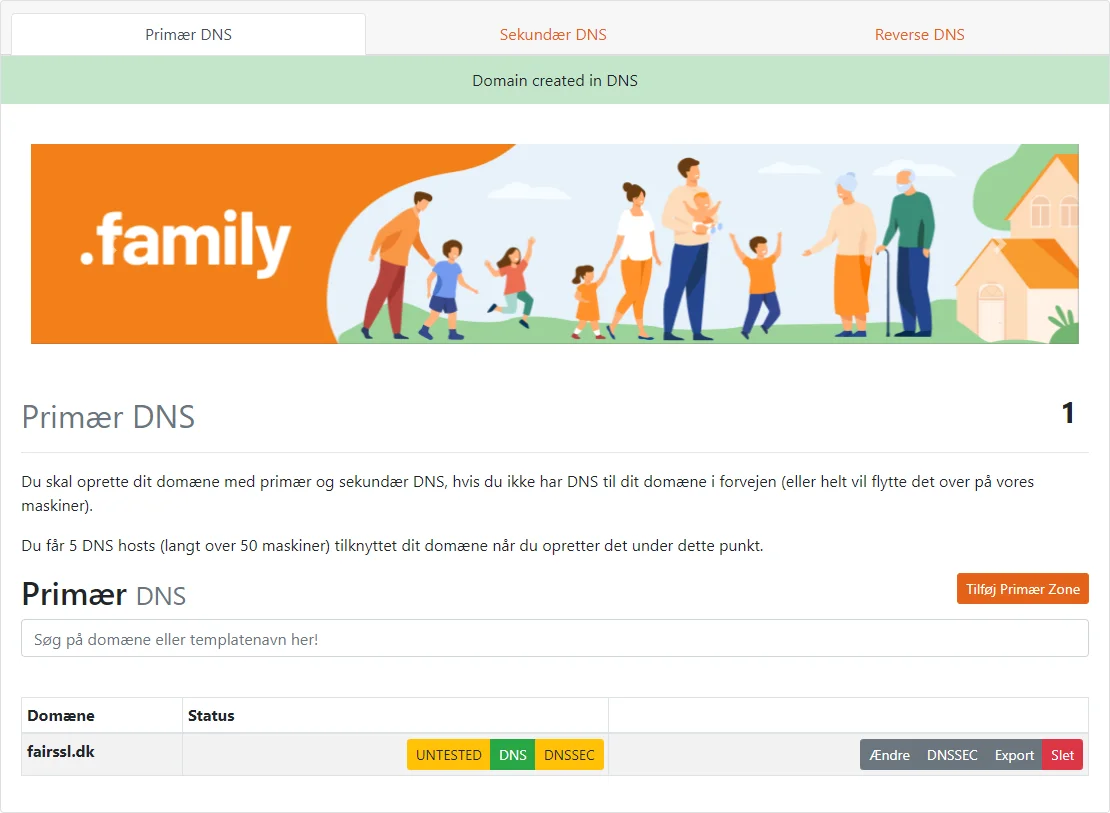
- Click Tilføj CNAME record.

- Enter the information you have received in an email.
Host: The address the record should point from on your domain. Remember the initial underscore. e.g.: _1f104a0bc617b3f5d05016e924c07fa7.test.fairssl.dk
Cname: The address the record should point to at the issuer. e.g.: 24BA199E88C4D7A460F7BF28DDFB4AE8.57D5EDEE1A1935B34D4836A5867F9244.105087.sectigo.com
TTL: Set to: 3600
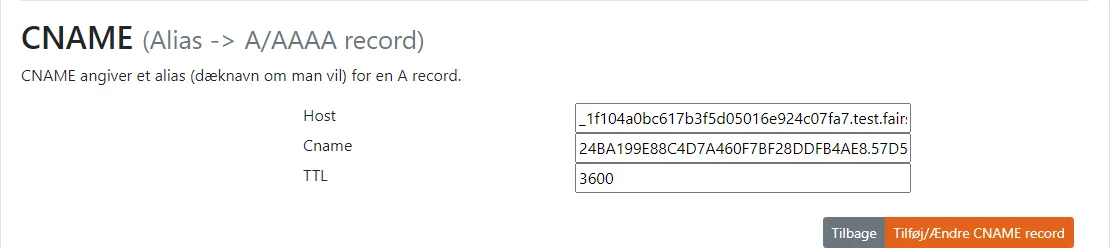
- Click Tilføj/Ændre CNAME record.
TXT-record
- Login to your GratisDNS control panel.
- Click DNS on the top bar.
- Click Ændre on the right side of the domain you wish to add a TXT record to.
- Click Tilføj TXT record.

- Enter the information you have received in an email.
Host: The DNS name the certificate is to be validated on, e.g.: test.fairssl.dk
Text: The text string you have received.
TTL: Set to: 3600
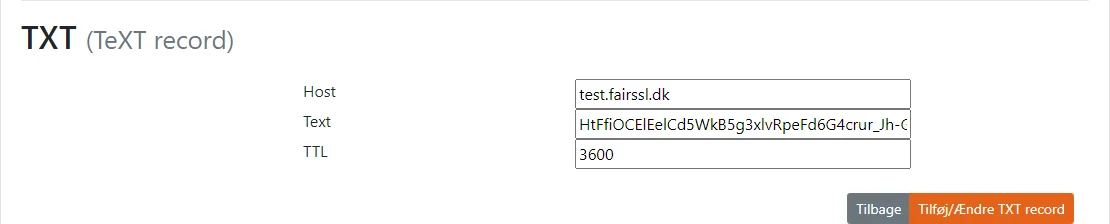
- Click Tilføj/Ændre TXT record.
Verify DNS-record
You can verify that you have created the DNS record properly by running the following commands.
It will be the same on Linux and Mac, except you use the terminal instead of a command prompt.
- Press windowskey + r.
Enter cmd and press enter to open the command prompt.
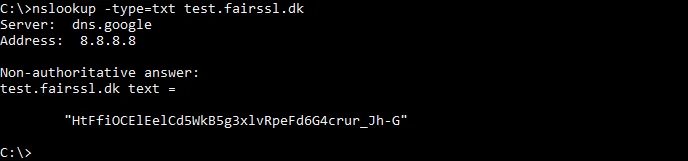
- Run the following command to verify a TXT record:
Replace test.fairssl.dk with the domain you have added the TXT record to.
nslookup -type=txt test.fairssl.dk
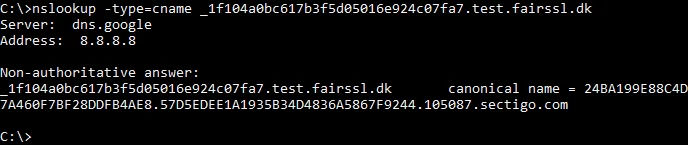
- Run the following command to verify a CNAME record:
Insert the address you have added the record to.
nslookup -type=cname _1f104a0bc617b3f5d05016e924c07fa7.test.fairssl.dk
Strengthen your TLS security
Use the Mozilla SSL Configuration Generator to generate a secure TLS configuration with modern cipher suites and protocol settings.
Mozilla SSL Configuration Generator guide