S/MIME Installation for Apple Mail (macOS & iOS)
A step-by-step guide to installing S/MIME email certificates in Apple Mail on macOS and iOS for digital signing and encryption.
Introduction
An S/MIME email certificate allows you to digitally sign and encrypt your emails. The level of encryption remains consistent across all certificate types; the primary difference is the identity information displayed within the digital signature.
View our full range of email certificates here.
Comparison of Certificate Types
| Feature | GlobalSign PersonalSign 1 | DigiCert Secure Email for Individual | DigiCert Secure Email for Business |
|---|---|---|---|
| Email address(es) | ✓ (1 address) | ✓ (+2 free SANs) | ✓ (+3 free SANs) |
| Employee name / Pseudonym | ✗ | ✗ | ✓ |
| Organisation name | ✗ | ✗ | ✓ |
| Validation | Email (DV) | Email (DV) | Organisation (OV) |
| Price / year | 400 DKK | 500 DKK | 950 DKK |
| Issuance time | Minutes | Minutes | 1-5 days |
We also offer GlobalSign Qualified Electronic Signature (QES, 4,000 DKK/year) and GlobalSign Qualified Electronic Seal (QESeal, 8,650 DKK/year) – qualified electronic signatures and seals provided on QSCD USB tokens.
Shared Mailboxes
For shared mailboxes such as support@fairssl.dk, legal@fairssl.dk, or sales@fairssl.dk, we recommend the DigiCert Secure Email for Business certificate using a pseudonym instead of an individual employee name. The pseudonym must not contain spaces – for example, use Sales, TechDepartment, or Support. The certificate will display the organisation name, the pseudonym, and the verified email address(es).
Installation in Apple Mail (macOS)
Apple Mail utilises the macOS Keychain for certificate management. Once the certificate is imported, Mail will automatically enable the Sign and Encrypt options.
Open Keychain Access. Search for "Keychain Access" via Spotlight (Cmd+Space). Please note that in macOS Sequoia and later, the app is no longer visible in the Applications folder but remains available on the system.
Select the login keychain on the left-hand side. Click File → Import Items.
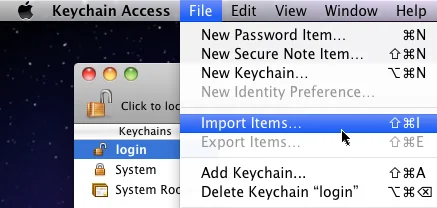
Locate your certificate file (.pfx / .p12) and click Open.
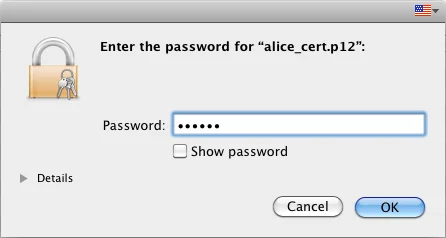
Enter the password associated with the file and click OK.
Restart Apple Mail completely (Cmd+Q, then reopen). This step is essential for Mail to register the new certificate.
Compose a new email. You should now see the Sign (✓) and Encrypt (🔒) icons in the message header next to the 'From' field. Click them to toggle signing or encryption.
Apple Mail on iOS / iPadOS
Export your certificate as a .p12 file and transfer it to your device (via AirDrop, email, or by downloading it through Safari).
Open the file on the device. Navigate to Settings → General → VPN & Device Management and install the configuration profile.
Enable S/MIME functionality:
- iOS 18+: Settings → Apps → Mail → Accounts → [your account] → Advanced → S/MIME
- iOS 17 and earlier: Settings → Mail → Accounts → [your account] → Advanced → S/MIME
Enable Sign and, if required, Encrypt by Default.